Showing posts with label DIY. Show all posts

Sunday, July 14, 2013

Homemade Doughnut (holes)

Hey! Natalie and Amanda here.

We got kind of bored today, and we were craving a treat, so we decided to make doughnuts. Which later just became doughnut holes. This is where we got the recipe.It was really delicious and the doughnuts turned out wonderfully!

You will need:

  • .25 oz active,dry yeast
  • 1/4 cup warm water 
  • 1 1/2 cups lukewarm milk
  • 1/2 cup white sugar
  • 1 tsp salt
  • 2 eggs
  • 1/3 cup shortening
  • 5 cups all-purpose flour
  • 1 quart vegetable oil for frying
If you choose to make your doughnuts with a glaze, here are the ingredients.
 (We just made ours with powdered sugar which we will explain later.)
  • 1/3 cup butter
  • 2 cups confectioners' sugar
  • 1 1/2 tsp vanilla
  • 4 tbsp hot water or as needed
Step 1
Weigh/measure the yeast

Step 2
Add it to the warm water, and let stand for 5 minutes, or until it's kind of foamy. We put our mixture outside on the front porch.


Step 3
In a large bow, mix together all the dough ingredients, including the yeast/water mix. Mix at low speed. We had to use a pastry blender to mix all the shortening in.

Step 4
Beat in the remaining flour (3 cups) 1/2 cup at a time, or until the dough no longer sticks to the bowl and is smooth/elastic.


Step 5
Put the dough into a greased bowl, place it somewhere warm, and let it rise. The actual recipe says to let it double in size, but ours wasn't going to ever double, so we just let it sit for 20 minutes, which worked out great.


Step 6
Put the dough on a slightly floured surface and roll out until it is about 1/2 inch in thickness.


Step 7
Cut the shapes of your doughnuts out. The recipe then says to let them double in size again, but Natalie and I didn't do this, and ours turned out great!


Step 8
Heat up the oil in a fryer or heavy skillet up to 350 degrees. Once it's heated up, begin to cook the doughnuts. 


Step 9
Make sure to turn them over so they are evenly brown (we recommend using tongs to turn them). When they're done, use the tongs to take them out, and put them on a plate covered in paper towels. 


Step 10
When the doughnuts are no longer steaming hot, roll them/dust them in powdered sugar if you would like. That's what we did, and they were great! Though we also discovered they were delicious if you put a little bit of peanut butter and raspberry jam on them. Or honey. Or cinnamon sugar. Again, if you just want a simple glaze, the instructions are here.

(this is when we sprinkled the powdered sugar on, it didn't work out too well)

(we recommend rolling it, because the sugar ended up sticking better to the doughnut holes)

And thanks to Khrys Bosland for the cute font used in the previous image!


Enjoy!

-Amanda and Natalie

Thursday, July 11, 2013

How to take pictures of sparkler images/words

Hey! Amanda here.

Since it's the summer season and many of you are lighting/watching fireworks, I figured it would be useful to write a post about how to take the long-exposure shots.

You will need:
  • A digital camera- one that has "bulb" mode
  • Sparklers
  • A tri-pod
  • People to help take the pictures
First off, set your camera to bulb mode, with the ISO set to 100.

Set up your tripod and make sure your camera is in focus- I know it's really tempting just to start taking pictures as soon as the sparklers are lit, but take a second and make sure it's focused, otherwise, the entire batch of pictures will be garbage quality.

Next, light a sparkler. When they start to draw or write, push down the shutter button and hold it down until they're done (it's helpful to have them say start and stop) or until the sparkler goes out. 

That's it! Here are some of the pictures we took with sparklers! Enjoy! Please comment down below with any questions you may have!

*This method (bulb mode) also works great for fireworks!


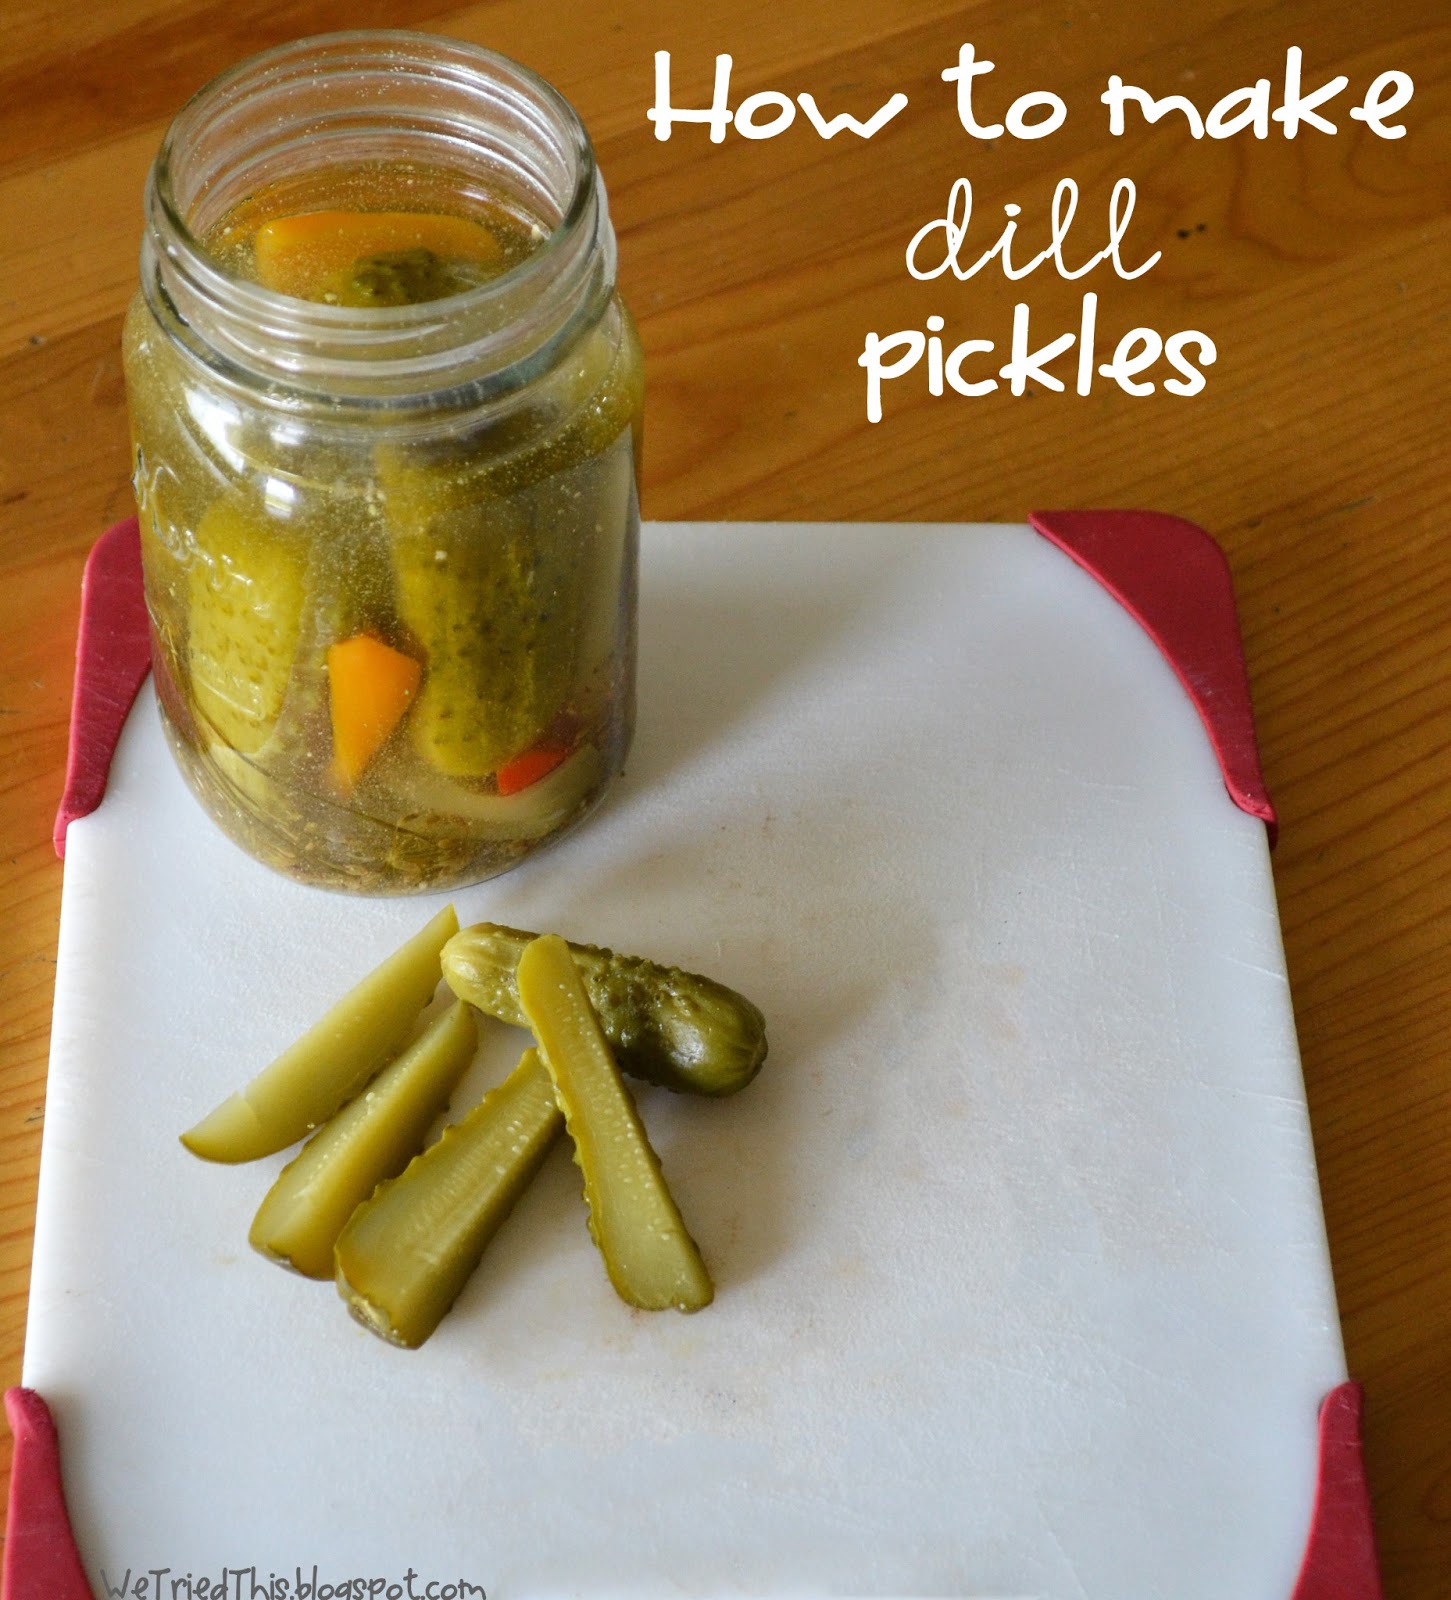
Dill Pickle Recipe -- a family favorite


I'll be the first to admit that I usually complain about canning season. That is, about everything except canning pickles. These are my favorite thing to can! Perhaps it's because I can do it in small batches, and it doesn't consume a whole day. Or perhaps it's because all the ingredients are fresh and home-grown.

I only use whole cucumbers for my pickles. I pick and store my baby cucumbers, up to a week, in plastic bags in the fridge -- UNWASHED -- until I have enough for a batch. (Washing them causes them not to store as well.) Also, if you're as addicted to canning pickles as I am, I suggest planting at least 3 hills of pickling cukes (we plant Pioneer Pickler). That way, when the cucumbers begin coming on, you can accumulate enough for a batch quickly. And, once you have canned enough pickles, you simple pull up the plants.

Happy pickling!


Dill Pickles

8 pounds cucumbers (I can whole cucumbers -- baby size. I think they stay crisper that way.)
1/2 c. sugar
1/2 c. canning salt (I don't know what canning salt is. I just use regular iodized table salt.)
1 quart vinegar (4 c.)
1 quart water (4 c.)
3 Tablespoons mixed pickling spices (in a tea diffuser or tied up in cheesecloth)
fresh or dried heads of dill -- 1 per jar
cayenne pepper or pieces of hot pepper
whole garlic cloves, peeled -- one per pint jar
ground mustard, fine

Wash cucumbers well; drain. Combine sugar, salt, vinegar and water in a large saucepot. Add spice bag to mixture; simmer 15 minutes. 

In clean pint jars place: head of dill, 1 clove garlic, 1/4 tsp. ground mustard, 1/2 inch piece of hot pepper (no seeds) or 1/8 tsp. cayenne pepper. Next, pack in clean, fresh cucumbers leaving 1/4-inch headspace.

Ladle hot liquid over cucumbers, leaving 1/4-inch headspace. Adjust 2-piece canning lids. (I like to soak my lids in just barely simmering water for 5 minutes before putting them on the jars.) 

Process pints and quarts 25 minutes in a boiling-water canner.

Note: After canning the pickles, allow 6 weeks before eating them so they'll reach their full flavor.


Monday, June 17, 2013

DIY Cute Hanging Make-up Storage


Christie writes:

Above is the purple hanging storage piece that inspired this entire project. Notice that I didn't say it was cute. That's because it belonged to Amanda and hung in her closet in her room that is yellow and gray. And it's definitely purple. Which clashes with yellow and gray. Amanda just couldn't take the purple anymore and asked if I could make something similiar to the purple piece but in bedroom-matching colors. It looked easy enough, so I said YES. 

I'm happy to report that I did it! It worked. It turned out. It's even cute. (It's posted at the bottom of this entry.) But it wasn't super easy. If you're new to sewing, this is not the project for you. Experienced seamstresses only. (BTW, how do you correctly refer to a male who sews? Is he a seamster? Leave your thoughts in the comments.)

Here are the fabrics that we used for this project. I used about 1/3 yard of the gray fabric to make continuous double-fold bias tape by hand. I'll post a future how-to on that, but would recommend that you not make your own double-fold bias tape. (It took a lot of time, and it's fairly cheap to purchase.)

The main section of the project is double sided. Each unsewn piece was 24" wide by 43" long. If you use the same fabric front and back, you'll need 1 1/3 yards of fabric. Using two different fabrics, you'll need 2/3 of a yard of each fabric.

I used a yellow plaid flannel for the back, thinking it would be a nice soft surface to have hanging against the inside of Amanda's closet door. (No scratching off of paint.)


Next you'll need some clear vinyl. I purchased mine a few years ago when I was re-doing the seat cushions on our outdoor patio chairs. You can usually find it at a fabric store and can purchase it by the foot. (You'll need two feet of it.) My vinyl was 54" wide. If you'd like to save money and have recently purchased a new bedspread or blanket, you can use the clear vinyl from a couple bedding bags.

Cut six vinyl strips that are 3 1/2" tall and 24" wide. These are for the top six rows. I made the bottom row pockets a bit deeper. I suggest cutting two of them that are 6" tall and 24" wide.

Once you have your double-fold bias tape, your fabric measured and cut, and a total of 8 vinyl strips, you're ready to get started.


 Step 1) Sew the bias tape along the top if each strip of vinyl using coordinating thread in a straight stitch. The vinyl is sandwiched between the folds of the bias tape.This step gives the finished product a crisp and durable edge for the pockets.


Step 2) Once you have sewn bias tape along the tops of each strip of vinyl, you're ready to start sewing the strips of vinyl to the front fabric piece -- right-side up. (See photos above.)

Start with the bottom pocket (6" tall) by carefully pinning it in place, aligning your pins vertically in the seam allowance so that you're not creating any holes in the vinyl that can be seen once the project is finished.

I sewed the vinly strips to the front fabric along the bottom of each vinyl strip 1/8" in from the bottom of the vinyl using a straight stitch in thread that coordinated with the front fabric (yellow). Once I'd sewn the bottom of the piece of vinyl, I'd also tack the top edge of the vinyl to the front fabric in the seam allowance on each side. I found that this helped to hold the vinyl in place better than just the bottom seam.

I left about 1/2" betweent the top and bottom of each row.

This step if the most difficult one of the entire project. Go slowy. Be patient. As you progress upward, sewing the vinyl strips onto the front fabric, you will probably need to roll the right-hand side of the project as you continue sewing the vinyl strips on. After a few rows, you will want to sew the vinyl strips on with the top part of the project on the right -- like I'm doing in the bottom photo above.


Step 3) I'm a perfectionist, so at this stage of the project I found it helpful to remind myself that it was okay if each row of vinyl wasn't perfectly aligned. Mine looked a little wavy at this point. I simply told myself that since it would be haning on the back of a closet door, it didn't need to be perfect, and I took a few deep breathes.

Now for the easiest part. Decide how many loops you want to hang your project by. I decided three loops would be good. Four would also work nicely. Multiply how many loops you'll use by 4 (inches). Now cut that many inches of the double-folded bias tape and sew a straight seam down the open side as close to the edge as you can. (I skipped sewing my bias tape closed, and it's niggling at me.)

Now cut 4" lengths of the sewn bias tape for each loop. Decide where to place your loops at the top of the front piece, and pin the loop to the front side of the fabric like the photo above.


Step 4) The end is in sight. Stay with me. For this step you'll be arranging the project with the front and back fabric pieces right-sides together. I laid the front piece on my table with the vinyl side up, and then draped the back piece over it, wrong-side up. Next, I pinned the two pieces together. Pay particular attention as you pin the sides and bottom, as you don't want to create holes in the vinyl that will be seen. I pinned between the vinyl rows on the sides, and horizontally in the seam allowance on the bottom.

You can round your corners at this point. I used a saucer from the kitchen to trace a nice rounded edge, and then cut off the excess. You can also decide to keep the corners square.

IMPORTANT: Mark off an 8" opening that will NOT be sewn along one of the sides. This is how you will turn your project right-side-out once you've sewn it together.

Carefully sew around the edges of the project in a straight stitch leaving a standard 5/8" seam allowance. Be sure to leave an 8" opening on one side. Once I sewed around the edges, I trimmed the edge leaving just over 1/4" of fabric/vinyl. Note: DO NOT trim the fabric/vinyl at the 8" opening.

Now you're ready to turn the project right-side-out using the 8" opening. At this point it's important to reach inside and firmly press outward on the seam -- especially at the corners. After doing this, I folded in the seam allowance at the 8" opening and sewed it closed close to the edge and continued sewing carefully around the entire edge of the project.


Step 5) It's time to use a dry-erase marker and make the vertical lines for the pockets. Be sure not to mark on the fabric or thread -- just the vinyl. We left the middle of the bottom row unmarked so that it would create a nice big pocket.

Once you have the lines marked, sew straight seams just to one side of the dry-erase line. (Note: If you sew right on top of the dry-erase line, it won't perfectly erase. Oops. I found out the hard way.)

The sewing segment of the project is done!


We hung our project using Command hooks, being careful to follow the directions on the package exactly.


Viola! There it hangs in all its glory. Whew!


Friday, June 14, 2013

Make Cute Cards from Thrift Store Books

Christie writes . . .

Everyone loves to get a cute, handmade card! The cards to the left are all cards that I created using white cardstock, scrapbook paper, and pictures taken from books I bought at my local thrift store.

Last year I read an article in my local newspaper about the book, A Simple Act of Gratitude: How Learning to Say Thank You Changed my Life. It inspired me to set my own card-writing goal for that year -- to write and send five notes every week for a year's total of 260 cards. I didn't quite make my goal, but I did send 201 handwritten notes in 2012.

I found that my favorite cards to send were the ones I'd created from cut-out photos I found in second-hand books. Best of all, the cards are quick and easy to make, don't cost a lot, and can make someone smile before they even read what you wrote inside.
                                                                               My very favorite second-hand books to use for making cards are photo gift books. Check out the photos to the left. They're all from a photo gift book I bought for less than a dollar and then cut apart. I especially like creating cards from gift books because they're small and have hilarious pictures in them.
 
Old yearbooks also can be used to make great cards. If the yearbook you'd like to use is precious to you, simply copy/scan the page that the photos you want to use are on -- no need to ruin a perfectly good yearbook. You can also opt to use yearbooks from anonymous strangers, like I do. The yearbook to the left is an old Utah State University Buzzer yearbook that I purchased at Deseret Industries. A clipping of the graduates in the caps and gowns would make a terrific graduation card!

Finally, when you're searching for used books to make greeting cards from, be on the lookout for books full of photographs. Old Guinness World Records books are particularly good, as they're full of strange and wonderful photos.

Please share your favorite sources for making fun greeting cards in the comments below.

Sunday, June 09, 2013

Ice Cream Sandwiches; With a Waffle Iron and Cake Mix

We were experimenting in the kitchen tonight. With cake. And a waffle iron. We were making 3 2 1 cake, which turned out to be gross. Don't try it. Then, Natalie came up with the brilliant idea to make ice cream sandwiches with cake mix. So! Here are step-by-step instructions on how to make them - we'll give a review afterwards.

Step 1
Get some cake mix, any kind will do.
We used some cake mix Natalie received for her birthday. Just follow the directions that are on the box for ordinary cake. However, after we mixed the cake and made the first sandwich pieces, our cake tasted like eggs. So, we added cocoa and sugar to try and get rid of the egg taste. It ended up working for us!


Step 2
Heat up your waffle iron/maker. When it is heated up, pour the cake mix onto the hot plate.


Step 3
Once the cake mix is completely cooked (it needs to be a little bit crispy so it doesn't fall apart), take it out carefully (Natalie and I had to use 2 forks and a spatula) and let it cool.


Step 4
Break the waffle apart, we broke it into fourths, and put some ice cream on top of it.


Step 5
Eat it. 


Review
Natalie and I thought these were okay, but they weren't anything special. They were fun to make and experiment with, and we might make them again, but only out of summer boredom.


Comment below if you find any ways to make this treat better!

Thursday, June 06, 2013

Organize Jewelry with Screens

BEFORE:

This is how I stored my necklaces before I figured out a better way.

Note that they're simply hanging on a child's hanger. Getting a necklace off is not fun. It entails correctly selecting the strand you want and hoping that it doesn't get tangled with all the other necklaces hanging on that side. Yuck.

I'm happy to report that I found a much better system. It's customized, simple, and it keeps everything from tangling.

AFTER:


What you're seeing are window screens with drapery hooks inserted to hold necklaces and bracelets. Earrings that have french hooks can simply be slipped directly into the screening.

There are many great things about this system. First of all, it's customizable. I had space by the light switch in my walk-in closet where I wanted to hang jewelry and another spot on the side of my built-in shoe organizer. I did some measuring and figured out that three 10 by 18 inch screens would fit perfectly. I simply had my local glass and window shop --  Bennett's Glass -- make them. (See details on screen specs below.)

The next great thing about this system is that you can hang matching jewelry together making it easy to mix and match your accessories with your outfits. Now instead of looking in three different places for necklaces, bracelets and earrings, I can just go to one place to find them all!

Finally, this system is completely removable. Because I attached the screens with 3M - Command Velcro strips, I can temporarily take the screens down to rearrange the hooks. If, for some reason, I wanted to take them down permantly, I could. The strips are especially made to be non-damaging and removable from both the wall and the frames. Cinchy!

HOW TO MAKE JEWELRY SCREENS:


  1. Figure out where you could hang a jewelry screen. Tip A) I would NOT put them on the back of a door. That's too much movement and might damage the finish on your door and/or jewelry. Tip B) Horizontal spaces maximize the amount of jewelry you can hang. I feel like the screens placed vertically on the side of my shoe organizer were a little more difficult to organize than the horizontal screen above my light switch.
  2. Decide on the size of screen you'll need. Your local window/glass shop will need the outside measurement to make your new screen. Tip A) Make sure that you get the screen(s) made with metal mesh -- NOT fiberglass. The metal will hold up better with the drapery hooks and weight of jewelry.  Tip B) If you're looking to save money, try to scavenge for pre-made screens. My three screens cost roughly $15 each. But you might be able to find ready-made screens at garage sales, estate sales, farm sales, and possibly thrift stores.
  3. Purchase drapery hooks and Command velcro strips. When you're ready to hang the screens up, carefully follow the printed directions on the velcro strips to the letter. (It worked great for me!)
  4. Before attaching the screent to the velcro on the wall, insert the drapery hooks first -- sharp end first. And, yes, the hooks are going to bend/displace the wire mesh a little bit. But it's just a one-time thing. I have some fairly heavy necklaces, and although the hook makes a bit bigger hole upon insertion, it hasn't gotten any bigger with days of haning.
  5. Enjoy!